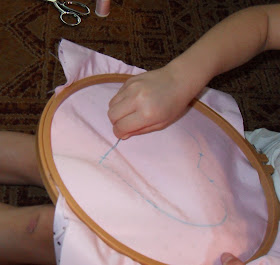
Anne had fun and stayed focused most of the time. We moved from the sewing room (it was hot in there) to the living room (where cartoons were on) and she did a great job! We used a wooden dowel with a small nail at one end to hold it to the fabric for the handle. My Princess Wand instructions below call for a wooden spoon,; it works much better! Also, after a while into the sewing, I was afraid she would poke her self with the needle as it went into the fabric towards her legs so I put a plastic tray under her work so the needle would hit that and not her.
What you need:
Princess Wand fabric, a wooden spoon with a long round handle, stuffing, paint and embellishments, sewing supplies.
Take a wooden spoon and make a paper heart that is larger than the spoon head. Really the heart should be a little larger than what I have in the pic here.
Paint the spoon handle a coordinating color for your fabric. We used an acrylic paint so it wouldn’t rub off on her hands when she played with it later.
While the handle dried we worked on the fabric. With the fabric in two layers, right sides together, put the fabric into an embroidery hoop. Out line your paper heart onto the fabric. (I used a water removable pen for this, but a pencil would work too) Mark at the top where an opening will be for stuffing, and mark at the bottom where the handle of the Princess Wand will be. Be sure to leave enough room for the spoon to slide in.
No tray here!
I put a few dots on the outline to show Anne where her needle would need to go in and out at, just to give her an idea of how far apart the stitches should be.
I thought that if I had her do them too close together it would become too tedious and she would lose interest.
She needed a break to hold her new baby sister!
Stitch on the line, stopping and starting at the marks for the openings. I took the fabric out of the hoop and re-stitched it on the sewing machine for added strength.
Then I cut out the heart about a ¼ inch from the stitching. Turn inside out.
Add some stuffing; then, handle first put the spoon into the heart. Stuff around spoon head and over top. Stitch the top closed.
that's the man of the house, aka 'Papa', in the background
Where the handle comes out, we decided to add some ribbons as extra decoration so we pushed the ends up into the heart and stitched the opening tight around the handle, being sure to catch the ribbon ends in our stitches. She didn't want her Princess Wand to be too fancy (I did) by adding beads or other things. Later we cut these ribbons off because Anne said they bothered her. Too funny; but I'm glad she knows what she likes!
Copyright © 2013 by Hill House Homestead ALL RIGHTS RESERVED


No comments:
Post a Comment
Gosh I love to read your comments! Thanks for leaving one :)