With as many children as I have around all the time I am always looking for good activities to keep them busy. One of their favorite things to do at my house is paint pictures and make crafts. I wanted to make aprons to protect their clothing and of course I wanted them to be very inexpensive. Most purchased children’s aprons are of a light weight fabric that paint goes right through; even the ones from home improvement stores still tend to leak paint. I always try to make do with what I already have so I started looking around my house and at my fabrics.
I had a canvas tote bag and the thickness of the canvas would be just right for the aprons. This is a great way to use those souvenir totes instead of storing them unused in a closet. I decided how to best use my tote bag for an apron before I started cutting. I wanted to do as little construction as possible and make use of all parts to save money by not buying anything and having a nice looking apron when I was done. It worked out great and I made a couple more the same way.
The first apron I made I just estimated were my cuts should be but I worked out a way to help ensure that the aprons would be the size I wanted using a shirt.
First I chose which side would be the back and cut down the middle from the top to the bottom removing the back handle. Then I cut to each side at the bottom cutting away seams.
I opened out my tote bag and centered the shirt on the side I wanted as the front of the apron. Will the handles need to removed or can the handle just be cut to size for the neck ties? On this bag I needed to remove them, they were spaced to far apart.
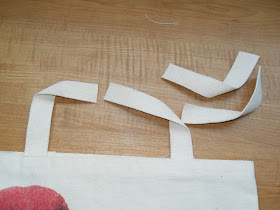
On this bag I left the handles on and cut them in half.
I determined where I wanted the top neck line of the apron to be and adjusted the shirt to correspond with where the apron would lay naturally if it were on a child.
I then decided where I wanted the edges of the apron to be from side to side at the top of the apron neckline. I placed pins there and at the place where I wanted it to come to under the arms.
Folding the back of the tote bag over the front of the shirt, I cut where I would like to have the back sides end at; cutting away excess.
Then I cut into the bag along underarm area and down front sides. Using something round to make a nice curve at the underarm, I marked and cut.
Decide how you want to finish off the cut edges of the apron.
I used seam binding on two of them; one a raw edge binding and the other a folded binding.
On the third I just stitched with a zigzag stitch. Apply binding or edging of your choice, or use a decorative stitch on cut edges.
Using the shirt again I determined how long to make the neck and back ties. If you left the handle on your tote to use as a neck tie, cut it to appropriate size. If you removed the handle, pin one end of the handle to apron top and adjust it to size, cut.
Stitch hook and loop fasteners to ends of ties or if the handles of your tote bag were not appropriate for this application you can use cloth ties or shoe strings like I did in the apron below. Attach neck and back ties to apron.
Here is how I first decided on my apron design, using a shirt and measuring tape.
I measured chest, length and how far down to armhole line. I measured the bag and pinned were the cuts should be, I noted that the handles were attached too wide.
The sides of this apron are more sloping and don’t wrap around in back as far as the last one I made. Doesn't the bag design make the apron fun?
You could also use an already made apron for a pattern.
Here’s what it looks like from the back.
You could line the apron with something water proof if you wanted. Some tote bag materials are somewhat water proof and could work well for these aprons. Wasn’t that easy? If you don’t have any totes they can be found at thrift stores and yard sales in abundance. Cost, almost nothing!
Copyright © 2013 by Hill House Homestead ALL RIGHTS RESERVED


No comments:
Post a Comment
Gosh I love to read your comments! Thanks for leaving one :)